
Platters are the ultimate entertaining food and you can scale them up or down depending on how many people you need to serve. Pretty much everyday I see beautiful platters on Instagram and am always inspired to make my own. But where do you start? Here’s my how-to on how to make your own delicious and Instagram worthy platter.
1. Start with a plan
It sounds overtop to have a plan for a platter, but if you are serving a large group of people, it’s important to make sure you have enough to go around. Once you know how many people will be enjoying your platter, you can start working out how much food you need.
Part of your planning should also include what foods you want on your platter. Is there a theme you want to follow, or a specific meal that you are catering for?
Some examples of platters are:
- Fruit platters: seasonal fruits such as strawberries, mango, kiwi, passionfruit
- Charcuterie platter: cheese, crackers, dip, cured meat, veggies and dip, pickles
- Brunch platter: bagels, spreads, seasonal fruit, pancakes or waffles, syrups, whipped cream
- Dessert platter: chocolate, candy, small cakes, donuts, seasonal fruit, chocolate covered fruit, cookies
- Date night platter: cheese, bread, cured meat, nuts, seasonal fruits, chocolate, dried fruit
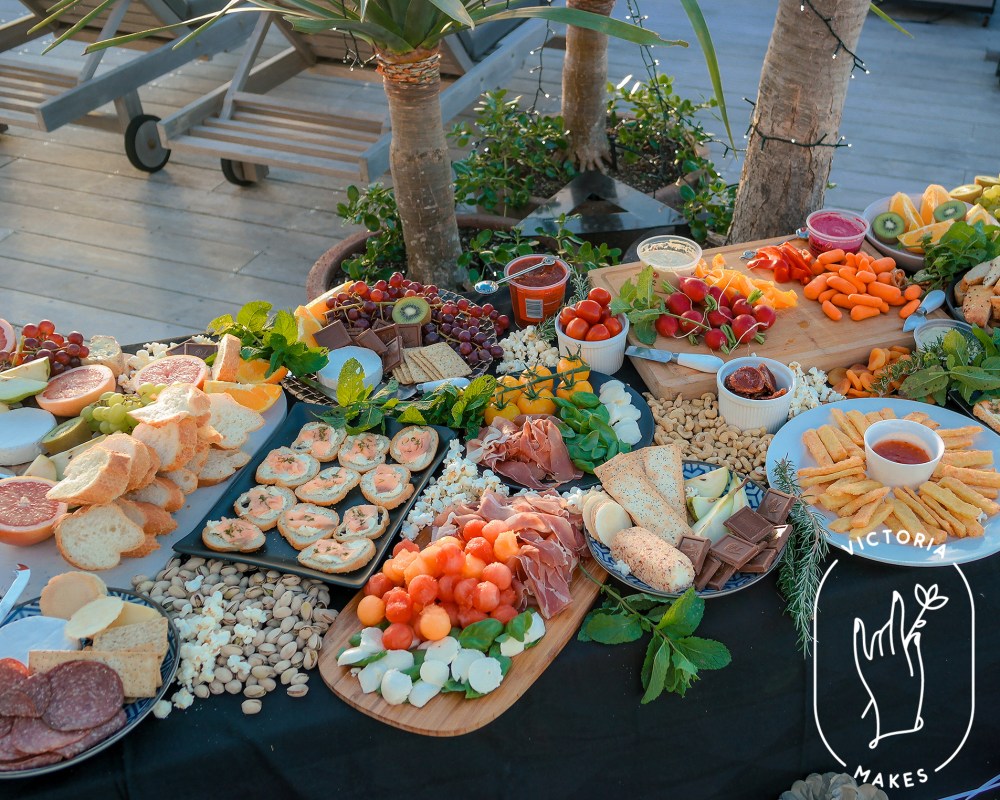
- Large-scale platters or grazing tables: cheese, bread, crackers, cured meats, dips, veggie sticks, seasonal veggies, seasonal fruits, nuts and seeds, dried fruit
These are all examples to help inspire you when planning what kind of platter you want to create, but you should also use what you can find in your supermarket or local market, as this can differ greatly in terms of cost and availability with seasonality as well. And feel free to include and exclude ingredients as you please. As you can see from the examples above, there is no real right and wrong way to create a platter.
For this post, I will be focussing on my fave type of platter which is an evolved charcuterie platter, but many of the same principles apply to whatever type of platter or grazing table you are creating.
2. Work out your shopping list
As a general rule, I like to buy cheese, meat, and bread or crackers based on a per person ratio, and then buy chocolate, nuts, fruits and any of those extras to help bulk up and fill the space of the platter or board I have chosen to use. I also use my budget as a guide as to what else to buy, and how much.
For a wine and cheese night, I use the following measures per person:
Cheese: 40-60g (budget dependant – dips can also be used to substitute this)
Cured meat: 50g
Crackers or bread: 5-7 crackers/slices of bread (baguette)
3. Buying your ingredients
When making a platter, I buy my ingredients from my local supermarket as it always has the things I want and I know they have a selection of meats and cheese that I like. However, specialty delis, markets, and cheese shops will also have perfect platter ingredients too.
So, let’s break it down:
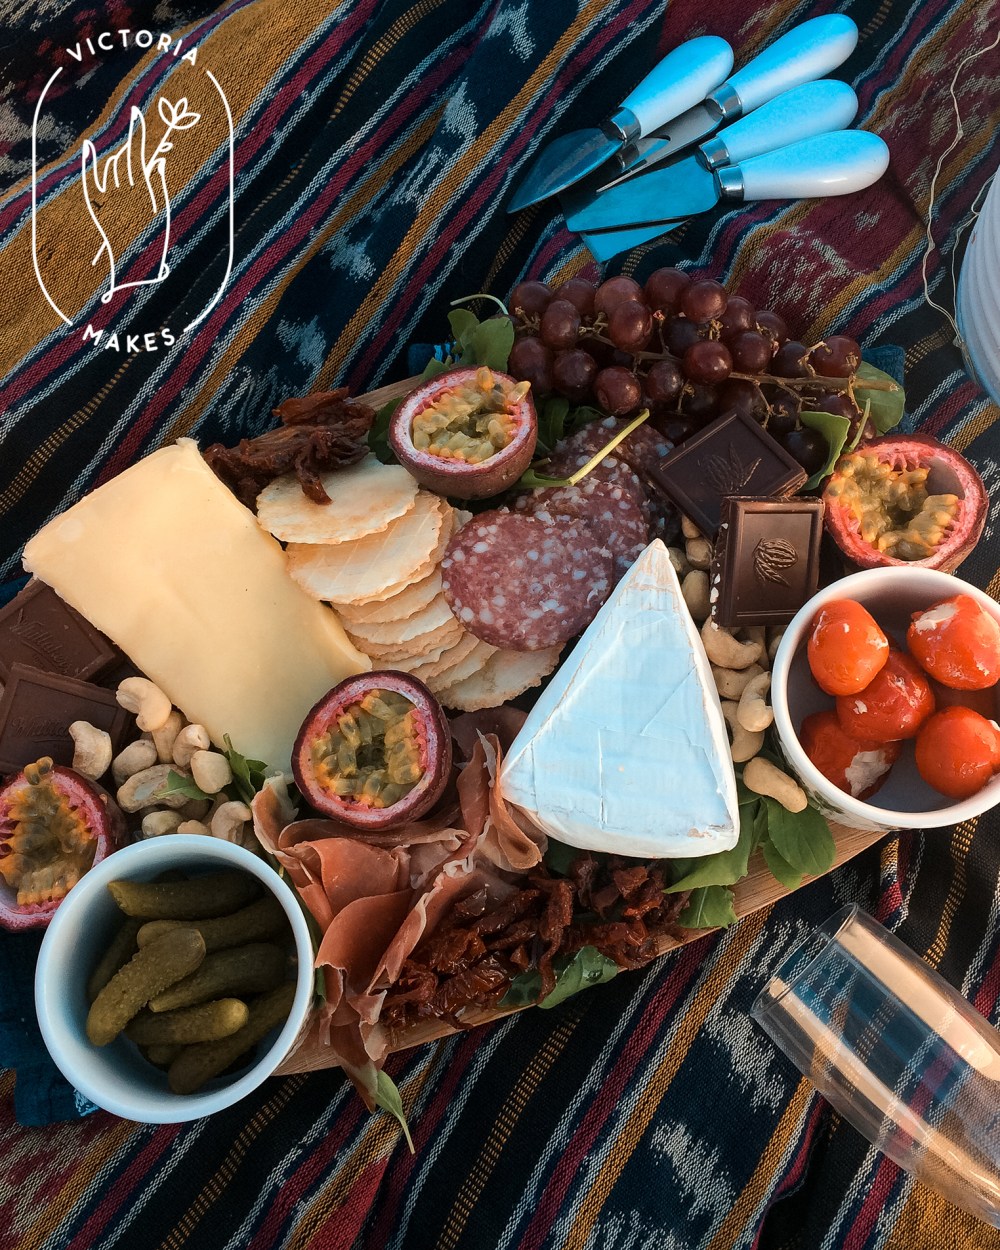
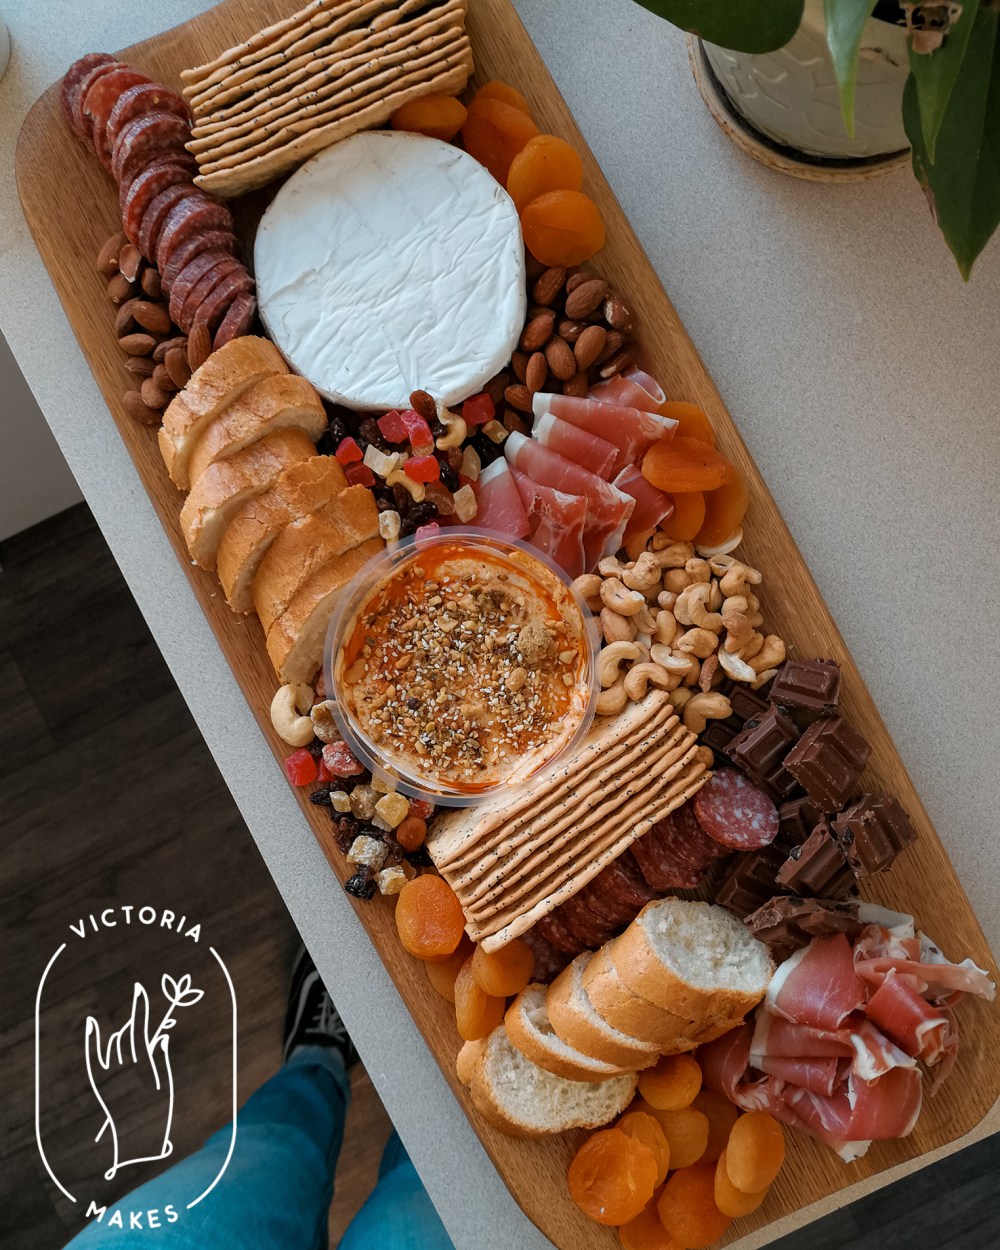
Cheese: I like to use a mixture of cheeses if I am making a platter, using soft cheeses and hard cheeses and different shapes and sizes if I can. The supermarket I go to has a few different size options for cheese too, so it is easy to buy a few different types of cheese without going overboard. My top picks are generally a brie or camembert and a gouda, buying a blue only if I know the people coming will eat it.
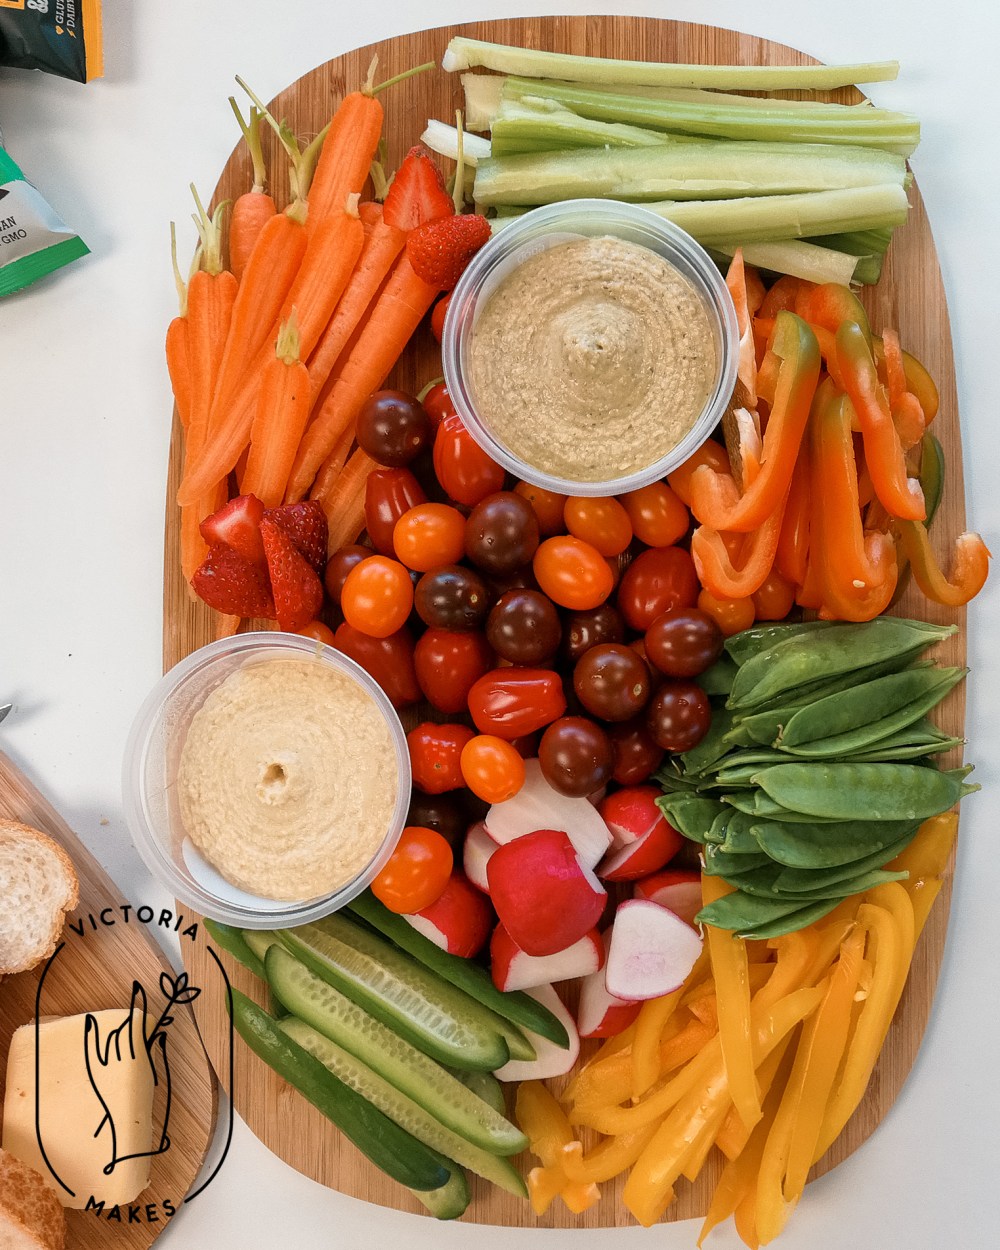
Dips: Sometimes I like to add a dip to my platter, this is especially good if you don’t want to spend too much on cheese. You can buy some great varieties of dips or make your own, some of my favourites are a hummus (and all of the different flavour varieties), or a sundried tomato pesto, but you can pick and choose whatever you like, or what is on special at the supermarket.
Cured meat: Buying cured meat from the deli section of your supermarket is generally always the most cost-effective way to buy the sliced meat, and you can get the quantity you want. I normally go for a mixture of salami and prosciutto, but you can add chorizo, roast beef or any other deli meats that appeal to you.
Crackers or bread: These are an important part of your platter, as they are the vehicle for most of the dips, cheese, and meat. I like to go for a mix of different crackers, and some supermarkets sell boxes of mixed crackers for this reason. Otherwise, I like to go for a nice water cracker, or hazelnut cracker if I’m feeling fancy. And I can never go past adding some freshly sliced baguette. Little crostini are also a great addition, as well as cheese sticks or pretzels.
Pickles and preserves: Sundried tomatoes, cornichons, cream cheese stuffed bell peppers, olive, pickled onions are all great additions to a platter if you want to include them too. My local supermarket has these available in the deli section, but the cost can add up, so I like to choose maybe one or two of these each time, but if the sky is the limit, then go for it.
Fresh and dried fruit: Grapes are a great addition to a cheese platter, play around with different varieties and colours of grapes for aesthetic purposes, but adding strawberries, passionfruit, pear or apple is also a nice look. Dried fruit such as figs, apricots, and dates are also a great touch and compliment the cheese and meat well. If you’re looking to branch out further, fruit pastes are really special, go for a quince paste, or even honeycomb if you’re feeling extra fancy and have the budget.
Fresh veggies: fresh cherry tomatoes, celery, carrot, radishes and snow peas are a nice fresh accent for a platter. They also add extra savoury freshness and are great grazing foods.
Nuts and seeds: There is so much variety in this category. You can go raw, savoury or sweet depending on other themes you have chosen. Almonds, cashews, peanuts, there are so many different nuts you can buy – try mixing it up by trying tamari almonds or honey roasted peanuts. Seeds such as pumpkin seeds are great for your platter too. Buy them from bulk bins in your supermarket for the most cost-effective ingredients.
Chocolate: I’m a fan of mixing savoury and sweet, especially on a platter. And some beautiful dark chocolate or other artisanal flavours always go down well. A salted caramel chocolate is actually to die for on a platter.
4. Assemble your platter
I like to start by putting my big things on the platter first – cheese, dips, bunches of grapes, spreading these out around the platter to create anchors and to balance the platter out. Then I add meat – if you want to be fancy, you can roll your cured meat slices to make a different look, or you can fold them, or just stack them. I like to break up the meat, by placing it on different spots on the platter, putting it close to the cheeses. If you look at the platters on Pinterest or Instagram, you will notice that most of them don’t leave spaces or gaps on the platter, creating a really nice, full look. You can use this same style too, or leave spaces if you have quite a big platter and don’t want to have too much of a border.
Start filling up your spaces with the other ingredients you have bought, grouping them together in nice piles, or by using small bowls. Again, I like to split the groups up to keep the platter even and balanced, making sure to not have all of the crackers and bread in the same spot. Not only does this make the platter look better, but it’s also functional, as more people can get to the different foods at the same time.
If you are using a few different types of fruit, you can play around with how you are cutting them. Pears and apples are nice in thin slices. Kiwifruit can be cut into half-circle slices. Try slicing strawberries in slices, without cutting all the way to the top, then twisting out the layers slightly, which creates a strawberry fan. Use a melon baller to scoop out balls of melon.
Dried fruit, chocolate pieces, nuts, and seeds make great fillers for any platter, and help to fill up the empty spaces you have, and create that visually appealing look of abundance. If you’re creating a grazing table, popcorn and fresh herbs are other great fillers to use, which are also practical and can complement the other grazing table components.
5. Serve your platter
Serve your platter up with pride – making sure to have small spoons, cheese knives and a dip knife (or butter knife) on hand to help make eating your platter easy. I usually just put napkins out, but you can put small plates out. Serve with a wine of your choice – I love to go for a rosé, because who doesn’t love rosé? Make sure you get your photos of it before it’s demolished, but most importantly, enjoy that beautiful platter!

You are literally the platter making god!
LikeLiked by 2 people
We need to step up the party snacks at your place next time right?
LikeLiked by 1 person
We so do!
LikeLiked by 1 person