Growing vegetables from seeds is a super cost effective, and rewarding way to create your own garden. You have full control, right from the get go, of how your plants are nurtured. And it is so fun to watch your little guys start to sprout. It can be intimidating growing plants from seeds, but it totally doesn’t have to be, and it is really simple. There is something so amazing about eating fruit or vegetables from a plant that you know started as a small seed that you planted and helped nurture as it germinated and then started to grow!

How to grow your own vegetables from seeds
Things you will need:
- Seeds (something in season)
- Seed trays (preferably something biodegradable like egg cartons, lemon halves with the flesh removed, or jiffy trays like pictured)
- Potting mix (I use a seed raising mix which specifically feed seeds and encourage germination, but you can use normal potting mix if you like)
- A container (I use an empty ice-cream container)
- Paper and a pen (for writing down what is planted where)
- Water (to moisten the soil)
- Gloves (to keep your hands clean-ish)
5 Easy Steps to Being A Master Seed Grower
1. Write down which seeds you are planting where, because if you are planting a few things, you wanna remember what you have planted! Keeping track of what you have planted makes it easier to also plan space and companion planting in your garden, rather than having a lucky dip!

2. Put some potting mix in the container, and mix a small amount of water in to the soil. Not too much, but just enough to make the soil slightly wet.

3. Fill your container about 3/4 of the way up with the moist soil and then place a seed gently on top the soil. If they are big seeds like pumpkin or squash seeds, I only do one seed, but if they are small like tomato seeds I will normally do a couple (just in case).

4. Sprinkle on top the seeds a little bit more of the moist soil. You really only need a very small layer of soil on top, as you want like sprouted seed to be able to break out of the soil and get to the sunlight.

5. Place the seed tray in a spot that gets good morning sunshine, as well as some shade in the hottest part of the day. This means that the seeds will grow well, and the soil won’t dry out. Make sure that you water the seeds everyday, but that the seed tray doesn’t flood, or that the water doesn’t pool, as this can damage the seed. I like to use a misting bottle to gently water the germinating seeds. If your seedlings start to grow mold on the soil, sprinkle a little cinnamon on top of the soil to help get rid of the mold, and if possible, move your seed tray somewhere with better air circulation (or place a fan nearby on a low setting).

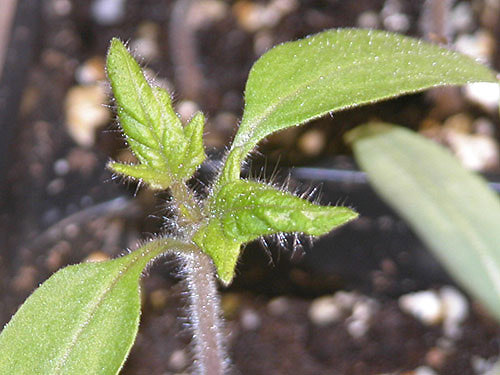
If you follow these instructions, you should have some lovely little green plants starting to sprout after one or two weeks. It is still important to ensure they are getting morning sunshine, and adequate water. Once the seedlings are well established, and their true leaves have grown they can be transferred to the main garden (true leaves are the leaves that grow after the initially sprouted leaves – pictured below). If you did plant a couple of seeds per cell in your tray, once the true leaves have sprouted, cut one of the plants at the base of the stem, so you just have one seedling per tray as if you try to pull the sprout out you can damage the roots of both plants.